
Surely my higly rated Naza guide for dummies had to move too.
I’ve done quite a lot of model making in my past, but building a multicopter was also completely new to me, so I’m trying to show & tell all the “noobs” like me out there how to set-up the NAZA V2 control system and or try to explain certain tripwires you could fall to, like I did in building / setting it up.
This guide covers:
- Soldering information, based on the F550 frame parts
- ESC + engine connections
- Flight system installation, wiring, placement and configuration
- GPS calibration
- Propellers + installation
- Landing gear installation
- Some LED fun
- Gimbal mount + setup
- Video transmitter installation and setup
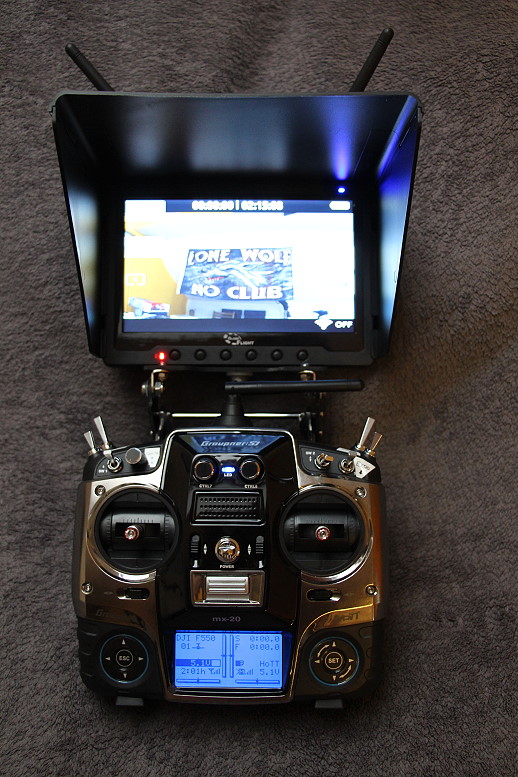
I’m flying my drone with a Graupner MX-20 2.4 GHz HoTT remote using the Graupner GR-24 HoTT receiver.
I would recommend a 10-12 channel remote to cover all the possibilities in the future use of the hexacopter
The basic channel control’s (needed / recommended):
- Yaw
- Pitch
- Roll
- Throttle
- 3 way switch for flight mode change: Manual / ATTI / ATTI + GPS (if the module is purchased)
- 3 way switch for Flight mode change: Off / Course Lock / Home Lock
- Failsafe
- Rotary knobs for in-flight gain control (changing the gains on how fast or slow the drone should react on stick movements [e.g. slow for AP and FPV and fast for sport / trick flying]
- Camera mount axis control 1
- Camera mount axis control 2
- LED position- / headlights for low light flying
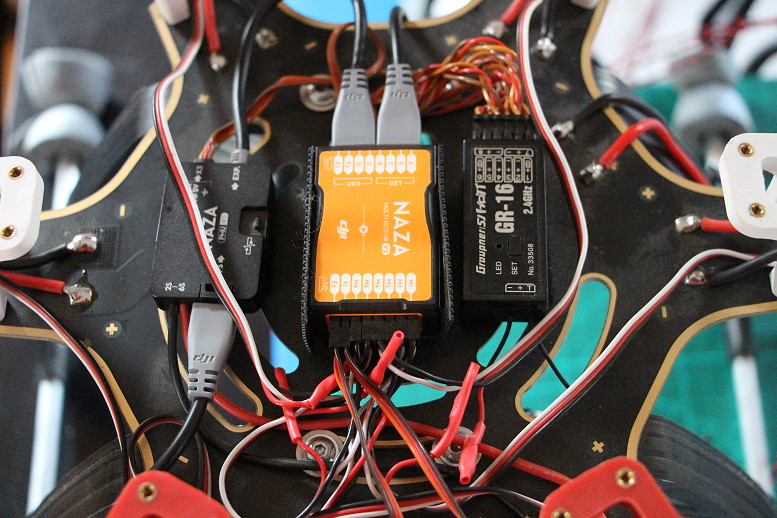
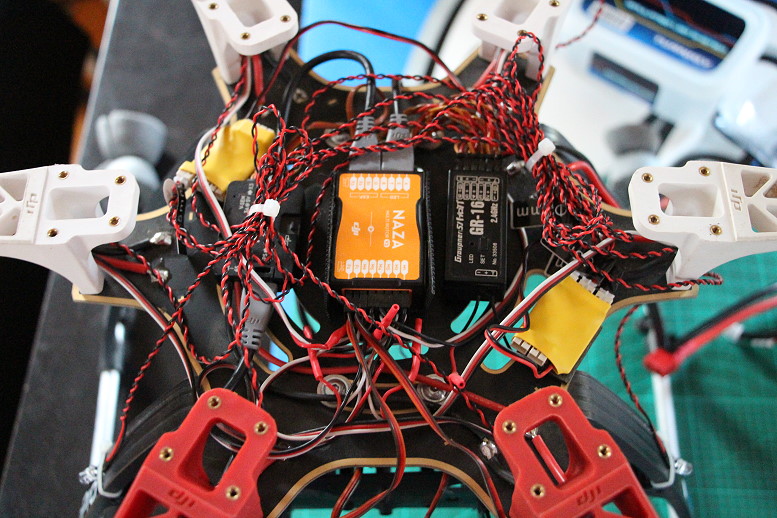
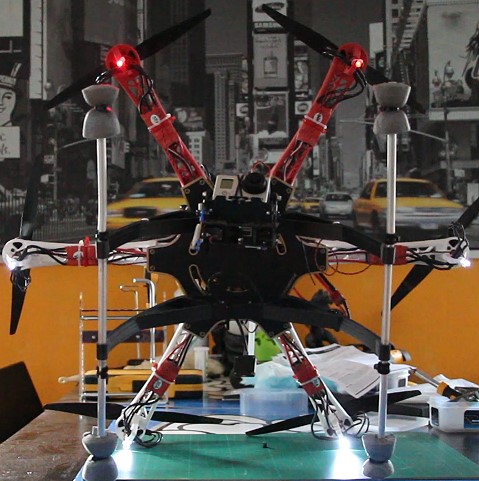
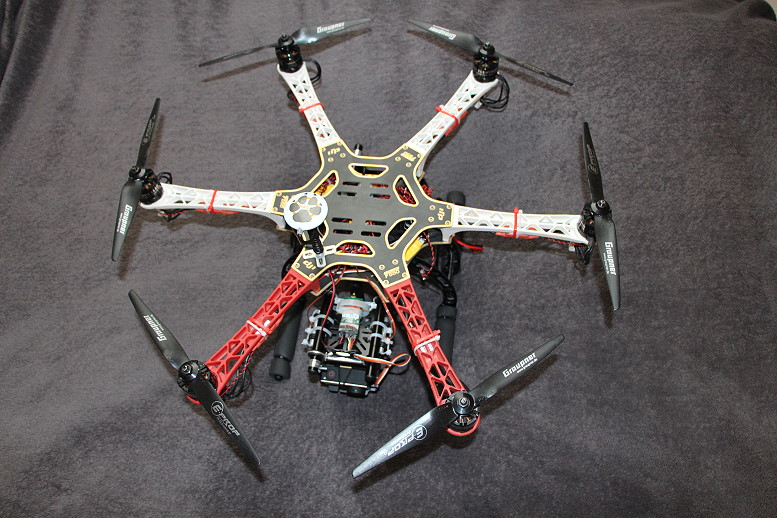
So, when you managed to solder or connect all your ESC wires (I put them upside down before soldering so that they can be attached properly to the arms without having twisted cables), the main battery connector cable and the NAZA PMU unit to the baseplate / power distribution board connect all other cables to the NAZA V2 (be careful where to connect it, because the ESC’s have to be plugged in in a pre-set manner depending on your type of drone, in my case its the frame of the DJI F550 which makes it a hexacopter with 6 engines):
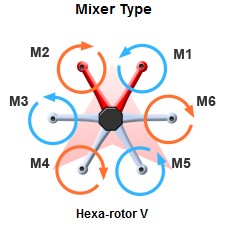
As you can see here, the red “arms” are considered the front of the drone and the engines are seen counterclockwise, labeled with engine M1 – M6, so you have to plug in the appropriate ESC cables to the NAZA engine ports.
The orange and blue circles around the engines tell you in which direction the engines have to rotate in the end, blue meaning counter clockwise, orange meaning clockwise, not paying attention to this can lead to an instant crash when you try to take off!
(I’m explaining the engine rotations and how to make them turn the way you want later on)
Now you have to connect all the other cables to the NAZA as explained on the main unit (e.g. LED port houses the flight LED / USB port, the PMU is the power distribution unit [where you connect the GPS module if purchased on the GPS labeled connector] and will be plugged into the EXP port)
When you’ve plugged in everything, we’re ready to advance.
Pay attention when you’re seating all the parts of the NAZA V2 flight control, the main controller unit has to be as centered as possible on the drone’s baseplate and the little arrow icon on it has to face to the flying direction (the 2 red arms) and should never be mounted upside down!
The PMU unit and receiver should be placed on the sides and as far away from the main unit as possible but also not too close to the welding points of the ESC / main battery cables to prevent interference.
I used double adhesive Velcro tape to secure them, firstly you can always re-set and re-arrange all the units and it offers some sort shock and vibration resistance, due to the fact that the NAZA main control unit doesn’t like shakes or vibration and could malfunction.
When you’re done with that I attached my ESC’s to the arms upside down using zip ties.
Now we’re ready to connect the engines. My ESC’s feature 3 bullet type connectors per engine and now here’s the tricky part: the ESC’s are upside down but the engines are facing upwards so now you have to think a little ahead:
- 3 engines have to rotate clockwise
- 3 engines have to rotate counter clockwise
So the simple rule:
Engines turning clockwise are connected like that:
Middle connector to the middle connector, left ESC connector to the right engine cable and right ESC connector to the left engine cable.
Engines turning counter clockwise:
Since our ESC’s are upside down they are connected straight forward: middle to the middle, right to the righ and left to the left connector.
That’s not so hard isn’t it?
Well if it would be easy, it wouldn’t get more confusing then this:
I’m using Graupner E-Prop propellers, you need according to the engines 3 clockwise and 3 counter clockwise prop’s, now there’s something special with Graupner E-Prop’s due to the fact that they are meant for airplanes, Graupner keeps telling the rotating direction as seen from the cockpit of a plane and not as seen while looking at the blade itself.
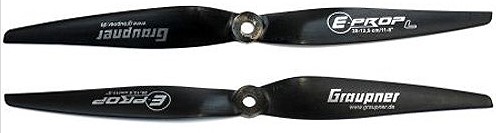
So the “L” labelled ones (for LEFT(rotating) actually rotate to the right and the ones without special labeling are rotating to the left. So you have to attach the “L’s” to the clockwise rotating engines and the non labeled ones to the counter clockwise ones.
Real easy to understand for a “noob” isn’t it?
When we’re done with attaching the propellers it’s time to get our receiver hooked up with the NAZA’s main unit.
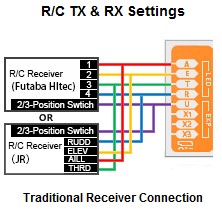
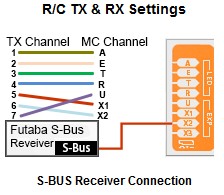
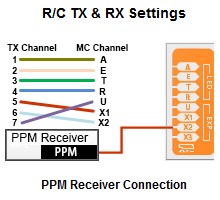
There are 3 ways to do this:
- Traditional wiring
- Digital over the humming feature using the DBUS (AFAIK Robbe / Futaba / HiTec) or PPM (Graupner) standards
If you’re using a Graupner remote, normally you would use the digital humming signal and only connect one cable to the X2 connector of the NAZA but here’s the tricky part: if your receiver has less then 7 channels you can not use the PPM signal properly due to the fact that one of the 3 way switches controlling the manual / ATTI / ATTI GPS flight mechanics is always mapped to digital channel 7 which is not accessible with only 6 channels.
So after some cursing around I had to switch to traditional wiring and had to connect 6 cables to the appropriate channels on the NAZA, if your receiver, like the Graupner ones doesn’t feature the “nose hooks” of the cables you have to remove the plastic noses of the cables in order to make them fit.
Channels used with traditional wiring:
D-Bus:
PPM:
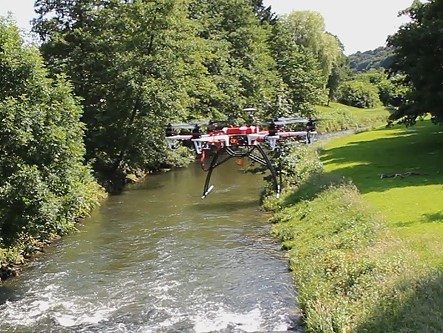
After this you’re ready to attach the top plate of the drone, when you bought the GPS module I used two of the screws of one of the front arms to also secure the base of the GPS module pole, due to the fact that the drilling holes fit the rear 2 screw holes.
When you attach the GPS module to the pole, make sure that the little arrow on the GPS dome also faces to the front / flying direction of the drone (the outgoing cable of the module is the front side).
I’ve attached the LED module hanging upside down on the rear side of my drone and secured it loosely with a zip tie to the landing gear to stay in place.
Now we’re ready for the fun part, powering it up and attaching it to a computer to set the everything up in the NAZA Assist software.
Install the NAZA Assist software, then download the driver package for your system (Win7-x, or Win8) you can’t install the driver package until your drone is connected and powered up by the flight battery.
So plug in your battery to the power cable of the drone and when you see the LED module flashing wildly, connect the USB cable on the lower side of the unit and start the driver installation package.
When he’s finished start the NAZA Assist software and register with DJI, if there is a new firmware available he will notify you about it and start’s updating your flight controller.
Now it’s time to set everything up:
- Click on the tab “Basic” select Aircraft and your type (in my case HexaRotorV)
- Click on “Mounting” there enter where your GPS dome is located from the center (as seen in the picture, if its in the front its a positive value, if its more in the back its a negative value, the height calculation of the dome is measured from the baseplate of the drone, not the landing gear!)
- Click on “RC” and select your wiring type (as described earlier above), now you have to see if all your sticks are moving correctly and are not mirrored in the movement, if so press the REV or NORM button next to the channel icons.Now select “Calibrate” and move all your sticks wildly around between the maximum and minimum positions per axis then click finish and observe that you’re not getting an error message telling you stick’s not in center and every slider should display a green middle position).See if your control mode switches hit the correct marks of the functions you want to use, if it’s not turning blue, you missed the mark and have to adjust the movement range of your channels on your remote until all the stick positions light up your wanted features in blue properly.If you want you can enable the “Receiver advanced protection” which alters the movements after reaching certain heights or distances.
- Click on “Gain” I would recommend leaving it to the pre-set values for now.
- Click on “Advanced” and select “Motor”, I would recommend to leave the idle speed at “Recommended” and set the “Cut Off Type” to “Intelligent”, that way he notices when you’re still in the air and won’t switch off your engines if you move your throttle stick below 10% while flying.
- Click on “F/S” and select your favored failsafe setting, I’ve selected “Go-Home and Landing” (he records his starting position when you got a GPS module installed when he starts and know’s where to return in case a failsafe event occurs)
- Click on “IOC” and decide if you want to use that feature, I’ve enabled it on my second 3 way switch.
- I don’t have a Gimbal yet and I’m missing the channels for it so I skipped that menu.
- Click on “Voltage” here I’ve selected “Protection Switch” ON, calculating your voltages and warning level’s isn’t easy so I can only go into a little detail here:
Don’t try to push your drone to the (battery) limits on the first flight’s, the batteries have to be broken in too and you have to learn how much power your drone draws while flying, to get a feeling when you have to get back or land (you can calculate that when you keep track of your flight minutes and taking a look at the charger, on how much power he had to put back in after charging).
My battery got fully charged around 5100 mAh, I was flying for 11 minutes, charged the battery, when he was done my charger told me he put back 4700 mAh so I was on the edge of an emergency landing.
- Click on “Tools” here you can calibrate the internal Gyroscope and Barometer and other internal sensors, I would recommend to at least run the basic calibration the first time it’s powered on.
If you bought the GPS module it also needs an horizontal and vertical calibration:
To calibrate the GPS module, disconnect your drone from the PC and use your remote to wildly switch around the “Manual / ATTI / ATTI-GPS” 3 way switch until the LED starts blinking wildly ORANGE-RED.
Now take your drone and rotate 360° with your body while holding it in a horizontal position.
The LED will start flashing wildly orange when you’re done with the rotation the LED will start flashing wildly green, now you have to tilt your drone so its facing downwards with the red arms and again, rotate your body 360° around while holding it in that position, the LED will flash wildly green while you rotate, when you’ve done it correctly the LED will switch off or occasionally start blinking red indicating the satellite strengths.
- 3 red flashes = worst signal
- 2 red flashes = bad signal
- 1 red flash = signal is ok
- no red flashes = best satellite signal
If you’re insecure about the signal strengths and don’t care much about “Course Lock”, “Home Lock” or “Return To Home” features for the moment you can just switch to ATTI flying mode without GPS support.
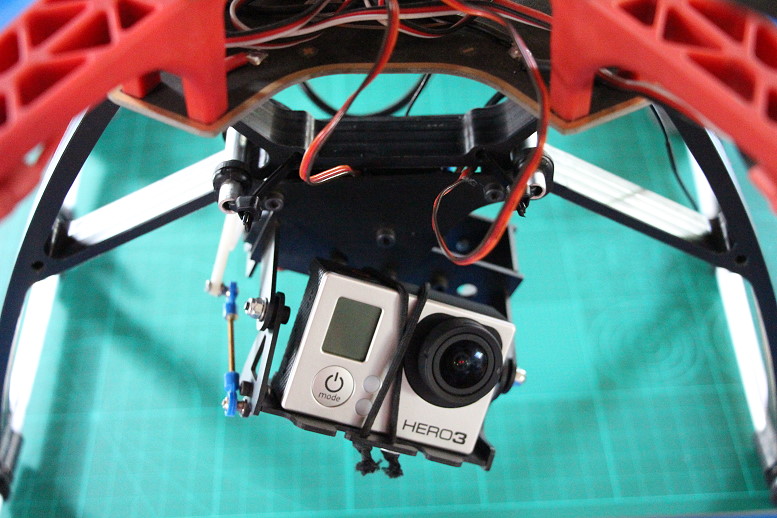
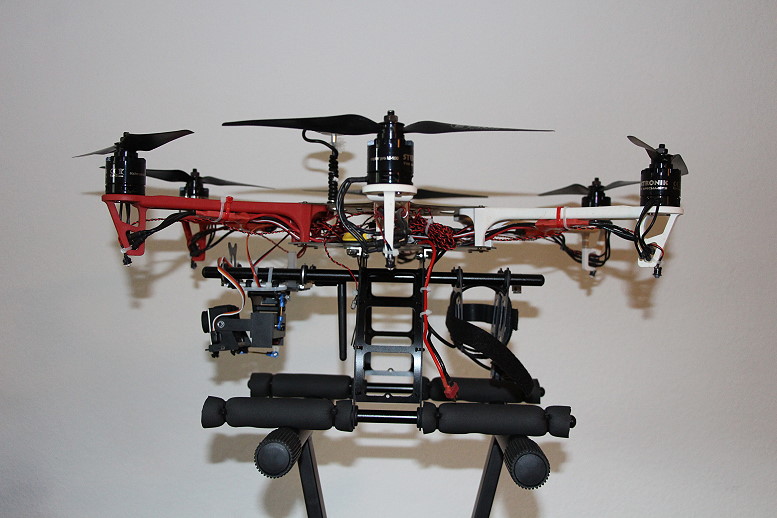
The camera gimbal and you:
So I finally came around to grab myself a simple servo steered camera gimbal, though I’m still lacking the channels to control it, the NAZA V2 can still use a camera stabilizer to keep it level led all the time no matter how the drone moves, so you won’t “see” the drone movements.
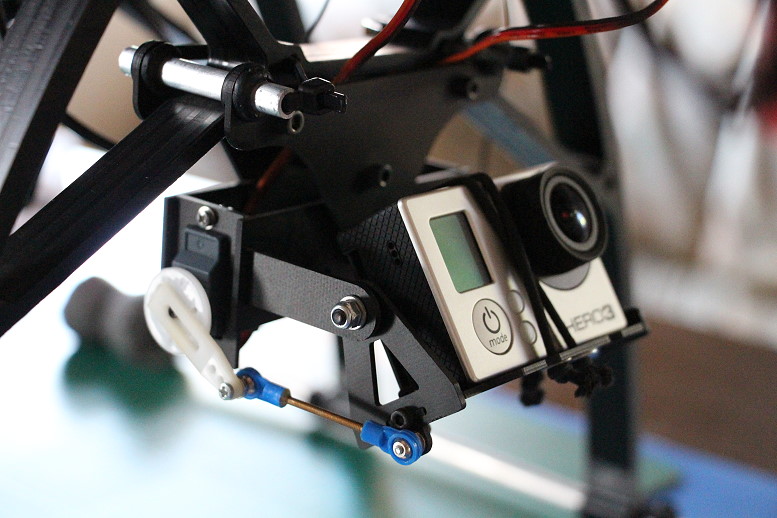
This is a cheap one from HobbyKing gifted to me by Yakoda, another multicopter flying furry friend. Better ones would use brushless motors and an own video controller (like the ZenMuse or other Cinestar systems)
Connecting is pretty straight forward, just put your servo cable for the gimbal roll (the “left and right” tilting servo) to F1 of the Naza controller and the pitch (the “up and down” tilting servo) cable to F2.
Now power up your system and start the Naza assistent software and go to the “Advanced” -> “Gimbal” tab.
Switch the gimbal mode to “On” and check that you selected the right output frequency for your servos. Now it’s time to set up the travel range of your gimbal(servos), this is an easy thing to do, just tilt your drone into a direction and enter a value (always hit return after putting a new value in) until the gimbal starts to re-position the desired axes to a bit further then the maximum range you were tilting it (this is to prevent the servos from getting damaged if they try to move further with force then physically possible with your gimbal frame).
Set the “Center” value for both axis until the camera is in your desired position (some like the camera to be tilted downwards, other’s prefer a straight front facing set-up, so it’s up to you).
If you pick the multicopter up and start to tilt it, but the gimbal is not reacting / moving, then you have to increase the values of the “Automatic Control Gain”, the higher the settings, the faster the gimbal will react, setting this too high could lead to a jitter behaviour or image shaking. When the gimbal moves “mirrored” just hit the REV or NORM buttons on the right of the affected axis.
When you’ve done everything the right way, the camera should now get compensated for every tilt movement you produce while holding the drone.
The X1 value and channel is meant for manual gimbal control if your remote features more channels and the desired channel cable is attached to the X1 connector of the Naza.
LED there be light!
One thing always bothered my with my multicopter, especially when flying in dim light conditions or with lots of sunshine: you can’t always make out if your drone is flying away, or coming back and or where it is at all (haha).
So I was looking for some LED lights, but I didn’t like those classical LED strips a lot of multicopter pilots use, I wanted something more “realistic”, so I went on the net and started looking around, finally I stumbled upon an Turnigy helicopter and plane LED system with controller, which features fully light up LED’s, white strobo LED’s and red breacon flashing ones + red and green position lights.
That sounded perfect, but since I got 4 white and 2 red arms, I ordered two sets from HobbyKing, because I wanted the white strobes on all white arms and the red beacons on my front red arms.
Today the items arrived:
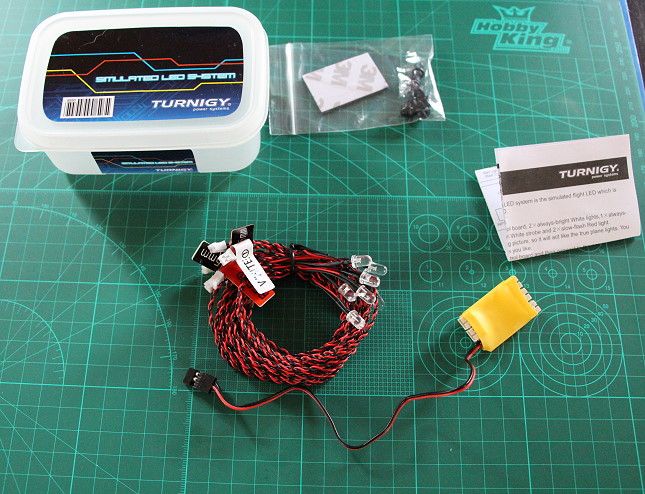
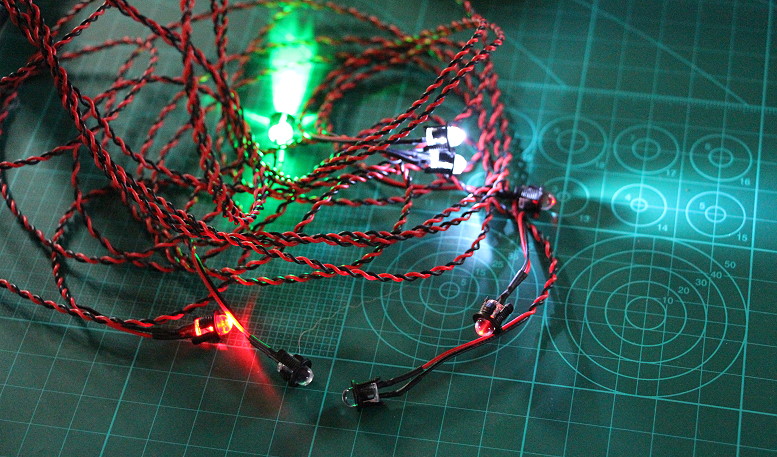
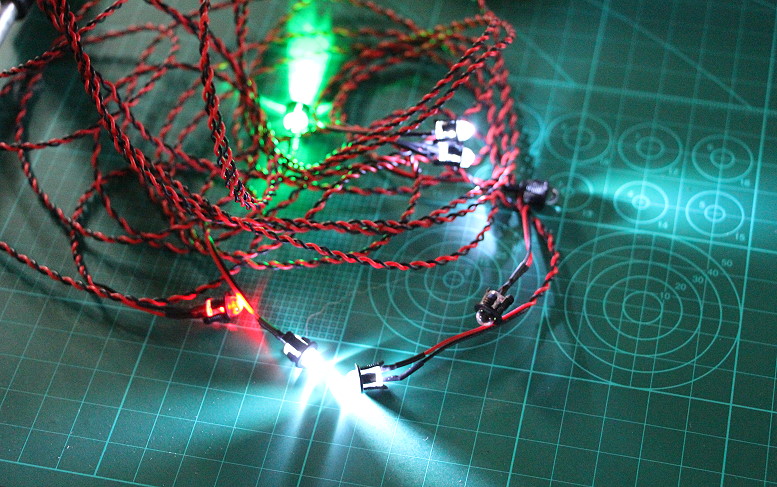
The system is fully receiver powered and works from 4-6V. I installed both controllers and just decided on a reduced number of lights:
- 4 x white strobo lights for the white arms
- 2 x red beacon lights for the front arms
- 2 x white always lid white lights which I put facing down on my front landing gear arms to light up the “GoPro” and “Be A Hero” logos on there.
This “LED” (haha) to quite a cable “mess” on my middle drone deck (before):
After:
But nothing a few zip ties can’t fix:
Finished “test-running” everything
Watch the lights video on https://www.youtube.com/watch?v=RQGZNygSI_w
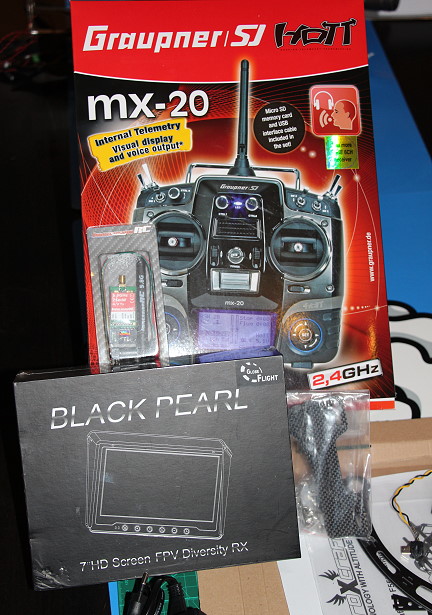
Well, looks like Christmas was early this year, due to not going on vacation I could invest some more into my drone.
So I was opting for an FPV video system, new remote (I stuck to Graupner with the big MX-20 [20 channels, 12 servo receiver]) and with my luck I even got a “special edition” with an free 12 channel, 6 servo receiver on top, new landing gear with better camera mount, a GlobeFlight “Black Pearl” 7″ screen with diversity 5.8 GHz video receiver, the ImmersionRC 5.8 GHz video transmitter, a GoPro3 live out cable and a carbon screen mount for my new remote.
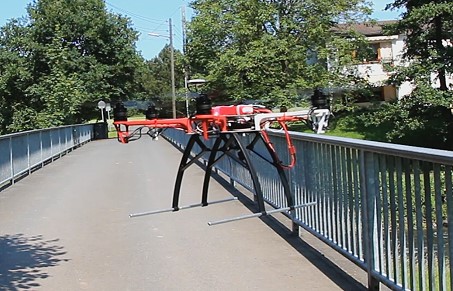
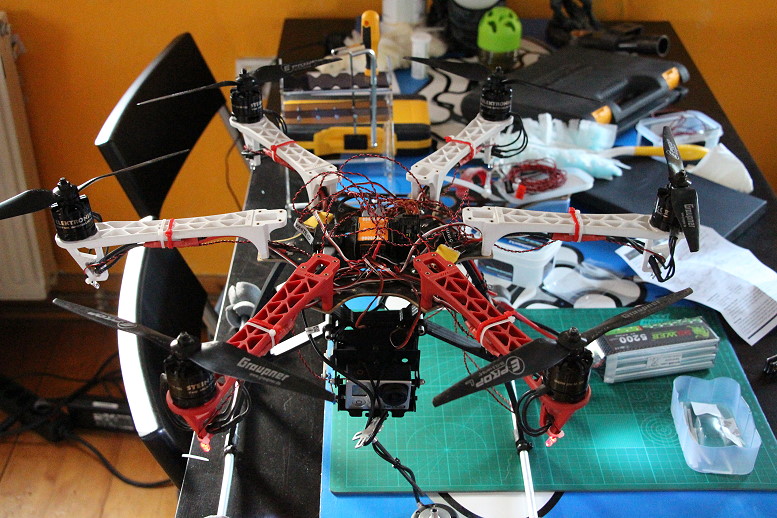
New carbon based extreme light-weight landing gear (which frees up space on my upper deck and getting the center of gravity below the electronics and with the new camera mount also my camera out of the way of capturing my landing gear or rotors in the picture):
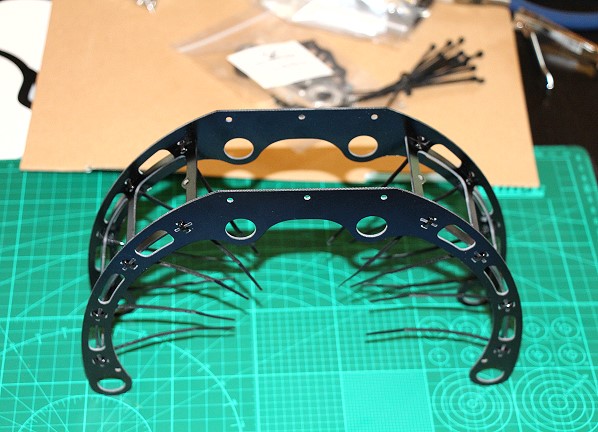
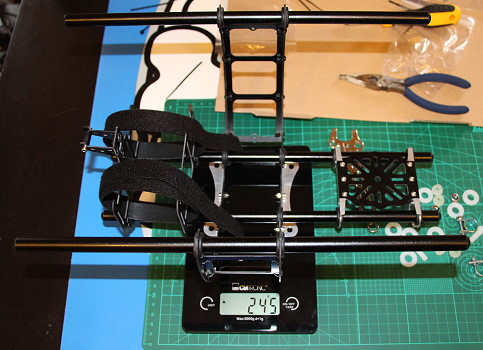
Full weight is only 245g (0.54 pounds).
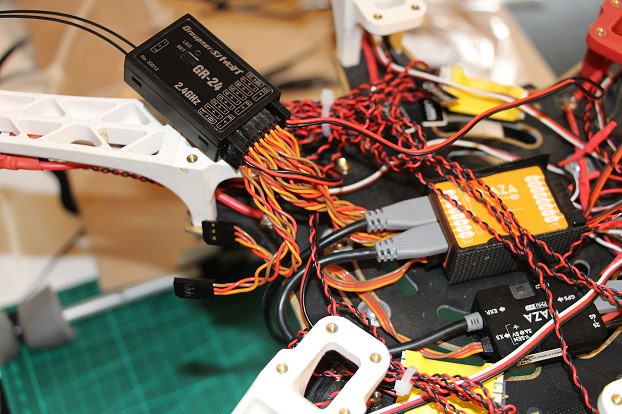
Now adding the new receiver (I feel like in an Italian pasta place…)
Now that I got more then enough channels, I could connect the X1 channel from my Naza to my remote to make my gimbal steerable on the pitch axis.
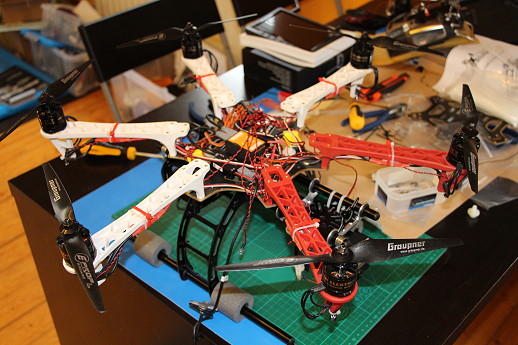
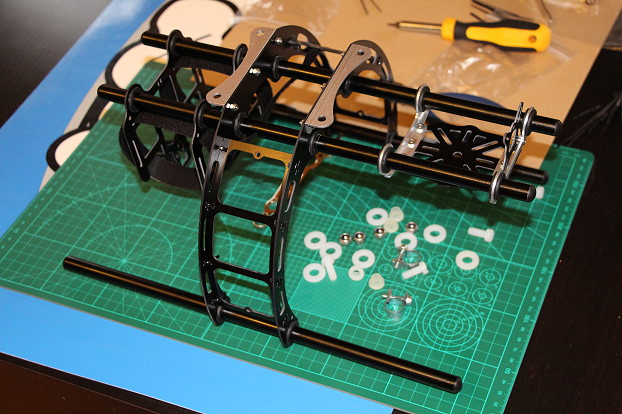
Just finished installing my drone on the new landing gear. Still waiting for the Armaflex tube to arrive to re-coat my landing gear skids with better foam tubes.
After that I assembled the carbon monitor mount for my new remote and installed the screen for testing purposes.
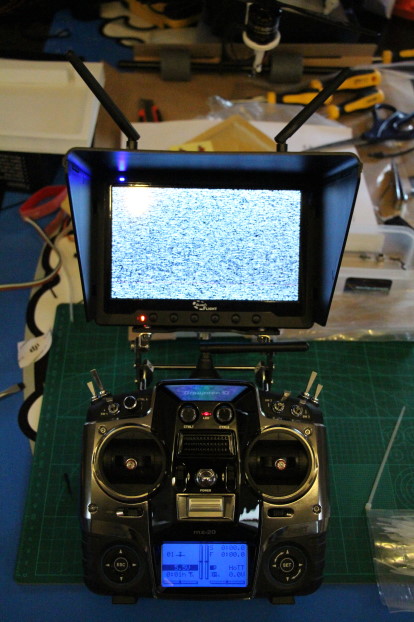
Total weight of the remote, including the screen is around 1kg (2.2 pounds) so it’s still manageable but you better not drop it, then it get’s expensive ;).
Due to switching remote’s I had to re-setup my whole multicopter, fortunately I just changed the cables 1:1 and added the new ones, so most of the sticks and buttons stayed the same, also having experience with Graupner remote’s it only took me a few minutes to get everything back on track with the new system.
I decided to assign a dial knob for the gimbal tilt function, so I used the one on the top left.
Now that the gimbal was working correctly I installed the GoPro live out cable, but only loosely positioned the video transmitter.
To install the video transmitter I had to remove the BEC cable from it and directly soldered the contact to my power board contacts, because the 6V output of my receiver is not enough to power it and I’m not using a BEC distribution board.
Everything else is pretty straight forward, connect the other end of the power cable to the transmitter, connect the GoPro live out to the plug of the transmitter, attach your antenna (Warning: DO NOT power on the system without an antenna attached to the transmitter, otherwise it can get destroyed!) now before we attach the transmitter to the frame, we have to decide what video channel to use and set those little jumpers accordingly.
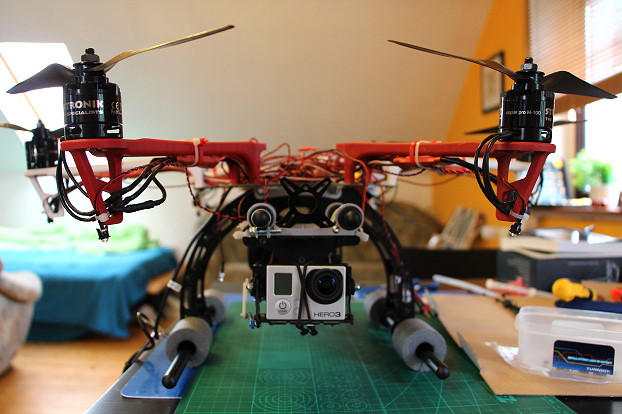
When that’s done you can attach the video transmitter wherever you see fit, I attached mine on the top of the camera mount plateau with the antenna facing down on the backside:
My selected live out cable also features a 5V supply current, so that my GoPro will be charged / main battery powered when my drone is turned on.
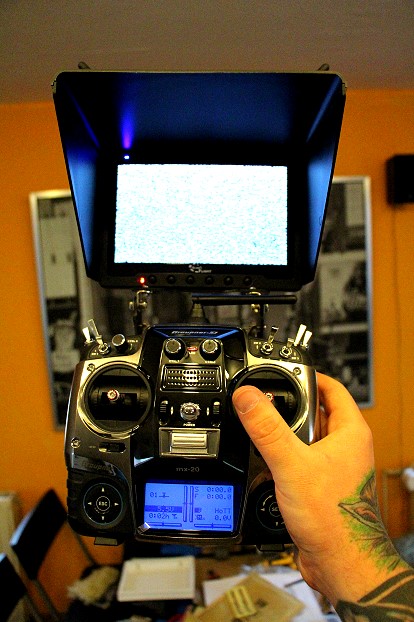
If you’ve attached everything correctly, then it’s time to check our monitor / FPV glasses if we can receive the signal correctly.
Switch on your remote, connect the main battery to you drone and after that turn on your glasses / video monitor.
Depending on your channel selection of the transmitter you have to find the matching channel on your receiver.
If that’s done it should look like this:
Now try if the camera mount is tilting the way it should when you turn your knob / slider.
Congratulations on your working FPV setup!
Enjoy a few shots of my new drone setup:


Now you’re ready to go, so get out there and have some fun!
If you have questions or need additional details feel free to contact me or leave a comment below.
Phillip
November 12, 2013 at 8:14 amGreat overview – THANKS.
Only thing is I only have 2-position switch for IOC and it does not work at all – no matter the time, distance etc etc. Just a dead function. The Assistant software says it works, but it doesn’t at all — many many tests, checks and verifications and calibrations. Flies real well though..
Tao Winterpaw
November 12, 2013 at 12:20 pmHello Phillip,
thank you for your comment, to be honest, I don’t know if it’s even possible to only use a “part” of a function designed for a three with switch with a two way switch.
Did you purchase the GPS module as well? and what firmware version do you use for flying right now?
Regards,
Tao Winterpaw
Phillip
November 14, 2013 at 9:47 pmThis came in one shipment as a DJI F550, NAZA M-Lite (supposed to be 100% the same functionality as NAZA M V1, with flight modes and IOC, but no waypoints or Z-gimbal connector), and the GPS compass.
Quite honestly, the Flight Modes of GPS and ATTI and even Failsafe work very nicely. It is only the Course Lock or Home Lock that neither works at all.
Distance no matter how far away, power up, LED indications, etc simply do nothing at all (except in software slider bar – perfect there).
I am completely stumped whu there is no IOC whatever in flight.
Thanks –
Phil
Phillip
November 14, 2013 at 9:50 pmPS –
My NAZA guide states on p.23 that it is okay to use 2-position switch; CL and OFF, or HL and OFF.
Brian Clarke
February 10, 2014 at 11:11 amExcellent article, have built and flown the Djif450and now about to start the f550, will refer to script when building.
Toby
March 28, 2014 at 2:39 pmHi,
This is a great site. Really helped me in building my F450 with Naza V2 + GPS.
I have a question that I hope you might be able to answer if that’s OK?
I have setup up the whole system calibrated the compass and everything seems fine. However, when I take off in GPS mode it seems very under powered. If I land and switch the flight mode back to manual there is loads of power available.
Also, i have noticed that after compass calibration (I get 3 green flashes and 1 red = good signal) about 10 – 20 seconds into flight the LED starts to blink red continuously. The manual says this is either compass calibration OR low voltage warning. I am using 3s and they are fully charged!!!
I didn’t go into the voltage settings in the naza assistant.
Hope you don’t mind me asking
All the best and keep up the great site
Toby
Tao Winterpaw
March 28, 2014 at 7:03 pmHello Toby,
thank you, for your comment. Regarding your questions, here could be several situations at hand.
First of all, an important factor is your weight to prop to thrust ratio, I had an issue using 3S batteries that my drone was just too heavy for them to handle it correctly. When I was flying with the 3S LiPo’s with my current props I had a maximum thrust of about 3.2KG (roughly 7 Pounds) but my drone was already weighing 2.5 KG (around 5.5 Pounds) so it was too heavy to be handled correctly even with high gain settings.
I noticed some “dramatically” behaviours on the first flights (mostly sudden altitude drops, having problems hovering and sometimes even “wobble” crashes). So I instantly upped my batteries to 4S, which provides me a thrust of roughly 6.6KG (14.5 Pounds) and increasing the weight of the drone to around 3KG (6.5 Pounds) just like that all the bad behaviour stopped and it was flying like it was supposed to.
So I would take a look at your props and engines if you find a table where you see the thrust to prop to voltage or xS battery rating. From my personal experience I would recommend a ratio of 2:1 in terms of thrust to weight.
The voltage settings in the Naza Panel er nor meant for regulating them, they are meant for the battery warning / failsafe landing.
Regarding your LED, GPS and manual flying behaviour:
– ATTI GPS = Fully stabilized flight due to known GPS coordinates regarding height and directions and all the levelling sensors of the Naza.
– ATTI = Attitude mode, stabilized in terms of hovering BASED on the gain settings in your Naza assistant (due to the lack of horizontally GPS coordinates he relies on your gain settings and his pressure altimeter and if your drone is too heavy or the gain is too low he could start to drop or you need to floor your throttle stick to stay in the air)
– Manual = Fully manual flight without any interference of the flight controller, you get 100% available power, throttle, axis movements, even if they exceed the stability limit of the drone (like you could flip over if you push the direction stick all the way because he won’t stop to tilt at a pre defined angle), this mode should only be used for “emergency” situations when you have to try to prevent a crash or a fly-away caused by the Naza controller.
And last, but not least your “GPS issue”:
If it flashes red all the time it means he has kinda “lost” his GPS lock and I wouldn’t recommend staying in GPS mode in that state, if you switch to ATTI without GPS does he still blink red or does he switch to blinking orange?
Reasons for this could be: bad GPS location (lots of magnetic interference, power lines, strong antennas nearby, train power lines and whatnot), a “magnetized” GPS antenna (check the GPS values of your flight controller with the assistant if they are above the recommendation stated in the GPS tab) if not, you should degauss your GPS antenna with a magnet and re-calibrate. I never had any GPS issues and mostly get an incredibly fast lock-on time with full green, no red flashes in the first 15 – 20 seconds after attaching the battery.
I hope that this little excursion could help you, if you still have questions just contact me / comment on my page.
Have fun flying,
Tao Winterpaw
Fredrik
April 8, 2014 at 9:22 pmVery nice conclusion on the F550 with Naza Wolf! Wish I stumbled across this before building my F550. The manual and DJI wiki leaves a couple of things open for interpretation 😉
Phil, I guess this is your thread -> http://www.helifreak.com/showthread.php?t=579865. If not, well the answer is at the end of that thread. Good to know during the setup of booth GPS/ATTI/MAN and the IOC functions.
Tao Winterpaw
April 8, 2014 at 10:49 pmHey Fredrik thanks for your comment. I will update my guide soon with camera gimbal settings and other useful information. Also I’m thinking about creating some video setup tutorials in the future.
Regards,
Tao Winterpaw
david
May 10, 2014 at 10:12 amI live in Pennsylvania and my naza v2 with gps drifts so I went online and found that my magnetic declination is minus 11degrees so I move it to the right? for negative? and about how far from center of gps module do I turn module to get minus 11 degrees?
Tao Winterpaw
May 12, 2014 at 9:00 pmHello David,
normally the whole “GPS disk” is measured a full 360° “shape” and saying that you have a -11° offset I would say you have to move it to the right, as seen from above, by roughly a few degrees. But in the end this is also a “trial and error” situation where you just have to rotate it to one side or the other to see when the behaviour will be fixed.
Regards,
Tao Winterpaw
john
June 11, 2014 at 7:32 pmHi I got one for you , nobody it seems can figure this out
when i hook up my quad into the Naza v2 assistant the GPS tab disappears on the control mode switch, its all hooked up right it seems but i am stumped?
Please help
Thanks
Tao Winterpaw
June 11, 2014 at 8:30 pmHey John,
could you please tell me what firmware you are using on your Naza?
Regards,
Tao Winterpaw
Aldo Rohlfs
June 16, 2014 at 10:20 pmHi. I installed the Naza V2 on a small quad 4S BATTERY and flys nice, then on a small hexa 4S BATTERY and flys nice too, but I have been trying to fly a big hexa with bigger motors and 6S BATTERY and in Manual or Att modes, the drone starts and goes high in the sky. Even at the minimum throttel its keeps climbig. I have to stop motors and let it drop and start again to stop the crashing. I have not installed GPS or Home lock, only controller. How do I get the motors to slow down?? Any Idea?? Thanks
Tao Winterpaw
June 17, 2014 at 7:09 pmHello Aldo,
for me it sounds like your gain settings are way too high.
Just connect your Naza to your computer and go to the Basic -> Gain menu and then reduce your “Basic” and “ATT” gain values and re-do your flight tests.
Also there is a good video guide over at rcgroups.com http://www.rcgroups.com/forums/showthread.php?t=1796013
Regards,
Tao Winterpaw
Stuart From Cambridge UK
January 6, 2017 at 3:55 amHi Tao
Firstly this is an amazingly simple yet informative site. You have written it so well, clear, concise and with enough depth to satisfy the beginner or more advanced.
I have built several multirotors (Drones) I only use DJI FC, mostly Naza V2 w GPS. It had been some time since I last setup a Naza and like all things, if not done frequently, I forgot in which order they needed to be done. So thank you for your guide. Would there be any chance of a downloadable version, say in PDF format.
Incase you may be interested here is the spec for my latest Multirotor which I have made and adapted
Tarot 680 Pro frame with extended arms making it 1040mm in diameter
Custom made Retractable legs (made longer)
Navigation Lights and Strobes fitted into the Standard Canopy
An additional plate to give more space for the electronics to be attached
Naza V2 with GPS
SunnySky V3508 KV580 motors x6
15 x 5.5 CarbonFibre Props x 6
40amp OPTO ESC’s simonK x 6
Spektrum AR9000 Rx
Spektrum DX18 Tx
Custom made wires for all connections
DJI BlueTooth (for gains adjustment & monitoring)
DJI Zenmuse H3-3D Gimbal
GoPro Hero 3+ Black Edition
DJI iOSD Mini
Fatshark 250mw VTx
Hand made Skew for VTx
7″ FPV Screen with custom Skew and Menace 5.8Ghz Patch Antenna
3D printed custom Lipo Connectors and lipo Mounts
2x 8000mah Lips 40C 4S, may change later
All electronics mounted to frame in custom made mounts.
DJI Groundstation with a dedicated IPad Air
Lights and vTx run off a separate Lipo (1300mah)
Tao Winterpaw
January 6, 2017 at 8:14 amHello Stuart,
thank you for your comment. I never thought about creating a PDF’ed version of this but I may give this a go this weekend.
Will let you know.
Regards,
Tao Winterpaw
Keenora Fluffball
July 16, 2014 at 9:21 amVery cool one :3 You made a very detailed report on the drone o.o!
Keep it up! :3
roberto
August 20, 2014 at 4:27 pmgood Morning,
I ask a big favor?
I have a transmitter Graupner MX-16 with the controller DJI Naza lite.
I can not find instructions for programming the fail-safe function on (sw 7) along with the flight mode Manual-Attitude-GPS on (sw 4.5)
I would be enough pictures of the programming on the transmitter
Thank you for any help.
Roberto
Tao Winterpaw
August 20, 2014 at 9:21 pmHello Roberto,
thank you for your comment.
What you try to do is not possible. I was facing a similar issue, you can set the fail-safe either on a switch position or as an action which is carried out when you switch off the transmitter / lose the signal.
If you want to set it as a fail-safe when you receiver malfunctions, just do the following: set the 3 way switch to all the regular functions you want, then change your servo traversing range for the switch channel to a position that the NAZA tells you, you are in fail-safe.
Now select your set fail-safe menu on your Graupner remote and let him record your actual 3 way switch position.
When this information is saved, change your traverse range back so that you hit all the 3 switch positions correctly, if you now switch off your remote, he will automatically engage the fail-safe position of the NAZA.
Regards,
Tao Winterpaw
Remi
November 5, 2014 at 2:13 amHi, how do you set up your radio for this? I have a Graupner MZ-18, and I do not know how to set up radio.
Heli, acro or glider? And there is many differents models in that menu.
Please email me if you can with the setup.
Tao Winterpaw
November 5, 2014 at 8:05 amHello Remi,
thank you for your comment.
I’m using the MX-20 it’s a bit different to the MZ series. Normally you don’t have to select a special model for the drone, you should stick with the regular airplane preset.
I will update my article with my remotes configuration for you later today.
Regards,
Tao Winterpaw
Remi
November 5, 2014 at 10:18 amGreat, looking forward to that 🙂
Mark
November 15, 2014 at 6:09 pmHi,
Nice guide!
have you cropped the video, or is there no need for that because you have no props in the image?
Thanks a lot!
Tao Winterpaw
November 15, 2014 at 7:46 pmHey Mark,
there is no need to crop the video, the camera gimbal is positioned that far in front that you won’t see the props.
(Though there are some shots in there, where they are visible due to the fact that the camera is tilted all the way up)
Regards,
Tao Winterpaw
arash
December 20, 2014 at 8:46 amHi,
Thanks for your informative website.
we connect PMU to the battery and the LED on the PMU is blinking red.
Do you have any idea about the reason?
cheers
Tao Winterpaw
December 24, 2014 at 7:33 pmHello Arash,
sorry for my late reply, I’m kinda in and out over the holidays….
When your PMU LED is lighting up / blinking red it means that your GPS module is not connected / installed
(I don’t know if you bought it with GPS or without) Otherwise check if your connectors are all tightly plugged into the PMU unit.
If the PMU blinks green he transfers data between the GPS dome and your flight controller.
Regards,
Tao Winterpaw
Mesnick
December 29, 2014 at 3:39 pmHello,
I’m testing a exacopter with nazav2, 4s-5000mAh (2 batteries in parallel), after I have connected the batteries and put in gps mode, await the green signal for ok, when take off the drone after a few seconds the signal is flashing red, is this normal?
frame 680 tarot
Motor 740 KV
propellers 10 “x5,5”
2 4s parallel
total weight 3.3 KG
thanks for your help
Tao Winterpaw
December 30, 2014 at 12:56 pmHi Mesnick,
how many times is the LED flashing red? normally this indicates the GPS signal quality or a low voltage alarm:
3 red flashes = worst signal
2 red flashes = bad signal
1 red flash = signal is ok
no red flashes = best satellite signal
Regards,
Tao Winterpaw
Frank Muccino
January 4, 2015 at 3:46 amOn my Naza software, the settings on my transmitter are flickering and not steadily in the middle (green). I did everything to the t. Can’t even get the motors to arm and run…. Help if u can…
Thank you, this was great by the WA,. And I use channel 6 to the u on the Naza, ch 5 to my 3 way switch set up as Gear.
Tao Winterpaw
January 7, 2015 at 9:26 pmHello Frank,
sorry for the late reply.
So what sort of remote are you using? Does it feature self calibrating sticks (like the Graupner’s?) otherwise if you can’t hit the mark or the middle positions are “flickering” try setting an exponential rate to your control’s, try maybe a 10% S-curve on the sticks and see if they stay on point.
Regards,
Tao Winterpaw
Juan Carlos
March 21, 2015 at 1:11 pmGPS v2
Juan Carlos
March 21, 2015 at 1:16 pmHi, Great Guide.
I will like to know if there exist any difference between the naza mlite and v2 compass gps. Also Ive read that exist 3rd party 4mm antennas and can change it easily inside the original gps.
Thank you for your comments.
Tao Winterpaw
March 21, 2015 at 3:35 pmHello Juan,
the main difference between the Naza m-lite and the V2 is the possibility to add extended functions to the flight system (camera gimbals with own controllers like ZenMuse, OSD overlay for video FPV flight, GPS ground station or other features / peripherals).
The m-lite uses a stripped down firmware and assistant software, so a lot of features a just not usable with the entry level flight system.
I would not recommend using 3rd party antennas, that could lead to unwanted behavior / crashes or maybe even fly-away’s.
Regards,
Tao Winterpaw
Jay Hanson
May 3, 2015 at 1:51 pmAwesome guide, Thanks for sharing! Have been flying a Syma XC5. In the process of building an DJI Flamewheel F450 with Naza auto pilot and GPS , Adding LEDs (colored strobes) and FPV. This guide will come in very handy.
Rainow
July 25, 2015 at 4:15 pmI built a flamewheel 450 with a Naza M V2 and have had great success flying with it for several months.
I’m just adding a brushless gimbal, being set up at the moment – there is what should be a small problem – could you help please?
I have the same radio as you ‘a Graupner MZ – 24 (good trouble free radio).
The Problem:- Have connected channel 8 of the GR-16 Hott Rx to Naza X1 and assigned it to DV2 on the Tx to achieve pitch control of the camera.The gimble is connected to F2 of the Naza. All seems OK, on tilting the drone the gimble/camera moves smoothly in the right direction but when turning DV2 the camera can only travel through about 10 degrees either way(I want to look to the ground) – the gimbal then gently objects to go further. Adjusting sub trim and/or E.P.A.on the Tx doesn’t solve or alter the problem. Experimenting a little with the settings in the Naza assistant don’t solve it either. I imagine I’m missing something with either the radio(It’s fairly new to me)or the Naza settings. Can you help please??
Ed G.
Tao Winterpaw
July 25, 2015 at 5:20 pmHello Rainow,
thank you for your comment.
I am using the Graupner MX-24 not the MZ-24.
Regarding your problem, did you calibrate the maximum movement positions for the manual gimbal axis in the Naza Assistant software?
If not just hit calibrate inside the software and move your desired knob / slider for the camera a few times between the maximum and minimum position.
Regards,
Tao Winterpaw
Rainow
July 26, 2015 at 12:57 pmThank you Tao, you’ve solved my problem. I didn’t realize calibration of the control knob was required (or even available) – hadn’t noticed it in the X1 section of the Basic RC screen. You’ve led me to take more notice of the rest of the NAZA Assistant in future.
Your ‘Naza Guide for Dummies’ ought to be seen as ‘the bible’ for people like me starting to dabble in drones.
Sorry I mistook the model/type of radio you use.
Thanks again,
Rainow.
Parham
September 18, 2015 at 12:08 pmHi guy , thank for your instructions .
I have a problem about arming my naza v2 . I had already fixed everything but my naza v2 doesn’t arm . Please help me .
Tao Winterpaw
September 18, 2015 at 6:51 pmHello Parham,
thank you for your comment.
I would need some more information to take a look at your problem:
– What NAZA are you using? (Lite / M2 /…)
– What firmware version is installed on your Naza?
– What type is your copter? (quad, hexa, octo…)
– What remote are you using?
Regards,
Tao Winterpaw
Parham
September 18, 2015 at 10:21 pmHi,
I’m using naza m v2 .
I installed the lastest firmware .
I am using f450 quad body .
I’m using devo7(walkera) radio.
Thanks for answering.
Parham 🙂
Parham
September 19, 2015 at 8:20 amThanks wild wolf , I found the problem .
Tao Winterpaw
September 19, 2015 at 10:59 amHey Parham,
what was you solution / what was wrong?
william rawlins
March 5, 2016 at 11:56 amhello i am a bit new to this
i have built a tbs discovery pro endurance quad
it has
naza m v2 with gps
aerialmob extension arms
tbs 400kv motors with esc
gimbal with gopro 4
it weights 1.666kg no battery
2.170kg with tbs 6s 4000mah 10c battery
frsky taranis plus transmitter with ezuhf module
the problem i have is i have it on the test bench(ie the kitchen table)connected to my computer with the naza software open then plug in the battery and start setting things up and i see the battery voltage drop down very quickly i have tried a few other batteries and they do the same i am 90% sure its not the quad as before i did the upgrades it flew really well (no electrical problems with quad) i am very unsure how to deal with lipo batteries do you have any kind of dummies guide to charging,discharging setting the first alarm second warning in naza how to work out the %of what you can use of a battery etc
i have looked at a lot of websites on this but then it gets very technical
hope you can help
Tao Winterpaw
March 8, 2016 at 10:19 pmHi Williams,
sorry for my late reply,
it’s not a subject where you can get an easy answer.
I’m not using the Naza built in voltage meter / regulations, since I’m not trusting them and I do not want to trigger a fly home and land event just because the voltage dropped below a certain threshold for a short time.
I am using an external LiPo guard, it’s a small device connected directly to the balancer port of the battery and is measuring the complete and single cell voltage, if the whole battery drops below a preset voltage a really loud siren gets triggered to notify you its time to land, this as a way easier method then trying to calculate the right voltage for your battery, since you don’t have to adjust it to different batteries.
You can mostly get a 3 – 5 pack of LiPo buzzers for dunno 15$:
http://www.ebay.com/sch/i.html?_from=R40&_trksid=p2050601.m570.l1313.TR4.TRC2.A0.H0.Xlipo+buzzer.TRS0&_nkw=lipo+buzzer&_sacat=0
For charging I can just recommend to always balance charge your batteries, some pages mention you can skip balancing for one or two charges, but I would always recommend to use the cell balance feature every time when you charge your batteries.
And I would recommend to get a LiPo tester as well, its a small plugin device which tells you your current battery charge and the charge of every cell of it (that’s a really important part! since all the cells should be at a close voltage range to each other, otherwise you get something called cell drift and that could lead to sudden voltage drops or complete battery failure).
LiPo tester: http://www.ebay.com/itm/RC-7-Function-Digital-Voltmeter-Battery-Tester-For-LiPo-LiFe-Li-ion-Nicd-NiMH-DE-/172088487192?hash=item281145ed18:g:7dIAAOSwGotWs1yT
I’m sorry if this comment get’s longer and longer but as you mentioned before this is not something easily explained and get’s real technical really fast.
But in general:
-> Do not discharge your battery more then 85% (better yet not more then 80%)
[You can measure the battery % with the LiPo tester mentioned above, he will display a % of the charge, so you can check the battery before you fly how full it is and after your LiPo buzzer told you to land, you can check again, if you discharged your battery below 20%, you can adjust your LiPo buzzer to warn you a little earlier {e.g. setting the voltage warning 0.1v or more earlier}]
-> Always charge your battery in balancing mode
-> If you are unsure if your battery is fast charging capable do not exceed 1C charge rate (e.g. if you got a 4S battery with 5200mAh you should charge it with 5.2A [1C])
-> If you have to discharge your battery I would also recommend to use 1C discharge current.
If you still have questions, feel free to contact me again,
regards,
Tao Winterpaw
Jon R.
November 8, 2016 at 10:05 amhey tao,
i am building the tarot ironman 680 with the naza M V2 and a futaba s-bus receiver and am having the same problem as someone mentioned above. first off I always get an error code on the assistant software that sas low voltage? all of the controls on the radio are in working order when running the software. I charge the battery fully and it still says that. second, I cant seem to get the motors to arm or work at all even on the test part, whenever I power up the hex, I always get reddish orange flashing lights? do you have any thoughts? I just tried the gps calibration today but nothing happened. any advice would help
thanks
Jon
Tao Winterpaw
November 8, 2016 at 10:22 amHey John,
are you using the Futaba 3008SB receiver? There seems to be an issue with this one and the S-Bus / DJI flight hardware since the NAZA doesn’t support TFHSS. Somebody mentioned on another forum that they could use the Futaba R2008SB receiver without a problem. Otherwise you could try if traditional wiring helps (I find that D-Bus / S-Bus wiring is kinda “creepy”, since you have to rely on one cable which steers 5 – 6 – 7 or more things).
Otherwise could you provide more information? (Exact model of the remote / receiver, NAZA firmware version…)
Regards,
Tao Winterpaw
Jon Rash
November 27, 2016 at 3:01 amHey sorry for the delayed response. I am using a rutabaga T8J TX and the R2008SB receiver. I finally got all the motors to arm and work on the motor test on the Naha assistant software 2.40 . version. Where I am at now is that I am still getting the red flashing led and low voltage error code. I am confused at how and where or to what to hook a voltage regulator up too that will allow me to use the voltage function on the assistant program. I also need to find out if rutabaga sells the replacement board and toggles for switches e & f because I accidentally dropped the radio and it broke those parts?. Any advice to get this thing going would be appreciated.
Tao Winterpaw
December 10, 2016 at 1:11 amSorry for my late reply, was kinda busy last week.
Well to be honest, I’m not trusting the voltage measuring and warning system on the NAZA system and just bought LiPo buzzers to attach to the balancing cables, they measure the real cell voltage of the batteries and will emit a really loud siren noise once the cell threshold is reached (you can easily hear it even more then 300 feet away). They are dirt cheap: http://www.ebay.com/itm/1-8S-Lipo-Li-ion-Fe-Battery-Low-Voltage-Meter-Tester-Buzzer-Alarm-/401159854833?hash=item5d66fd9af1:g:PQcAAOSwSv1Xljez
I got a few of those set to different thresholds depending on the batteries I’m flying.
Doing this you will miss the go home or land feature on low battery but I found that solution more trustworthy than the NAZA measuring.
If you have any more questions feel free to ask 😉
Regards,
Tao Winterpaw
Peter
March 6, 2017 at 7:06 amI’m having a problem getting my motor to work.
I’m new at building a multi rotor copter, I’m in the process of building a F550. Using Futaba 10J transmitter and r3008sb receiver with the naza v2 flight controller. Got everything hooked up down loaded the naza frameware programmed my naza, I did the motor test on the computer and everything worked fine. But I am not able to run the motors with my transmitter.
Please assist.
Tao Winterpaw
March 6, 2017 at 11:01 amHello Peter,
how did you connect the receiver? are you using single cables for all the functions or PPM / D-Bus?
And or did you use the “arm” command to start the rotors? You need to push and hold both sticks to the bottom left for around a second to start the rotors (and again both sticks to the bottom left for around a second to stop the rotors again).
Regards,
Tao Winterpaw
Peter
March 7, 2017 at 4:52 amI’m using single cables. I un-solder all my esc from the main frame and tried to program them individually and it still didn’t work. Should I reassemble everything, esc, receiver and controller and try your method?
Tao Winterpaw
March 7, 2017 at 12:31 pmDid you calibrate your receiver in the Naza assistant software and checked if all the stick and switch movements are correctly displayed there?
Peter
March 7, 2017 at 2:37 pmYes, the calibration into the NASA software was done successfully. I even test and set my motor rotations from the software but nothing happens with the transmitter after completing the software calibration.
rodney
August 20, 2017 at 11:37 pmI have a spectrum dx6e and a spectrum ar7700 receiver with ppm connection with naza lite everything works as it should but the control mode switch I cant get it to work the gear switch activates x1 and control mode switch is stuck in fail safe no switches on transmitter will work it
Tao Winterpaw
August 21, 2017 at 1:22 amHey Rodney,
your remote does not have enough channels to use PPM.
If your receiver has less then 7 channels you can not use the PPM signal properly due to the fact that one of the 3 way switches controlling the manual / ATTI / ATTI GPS flight mechanics is always mapped to digital channel 7 which is not accessible with only 6 channels.
Regards,
Tao Winterpaw
rodney
August 21, 2017 at 4:12 amyeah that’s what I thought the ar 7700 receiver will do up to 8 channels only if your transmitter has the capabilities in which case I just bought a spectrum dx6e 6 channel transmitter and I finally realized also I will need 7 channels- this sucks now I gotta sell my dx6e I just bought new and get a dx7
rodney
August 21, 2017 at 4:25 amscratch that last idea I will buy a new regular dsmx receiver and connect al the cables in traditional form,that wont be so costly and wont have to deal with selling the other one.
rodney
August 27, 2017 at 9:45 pmwell I got a new ar610 receiver and finally got my drone and naza set up the only problem im having now is if I turn off my transmitter the naza will not go into fail safe but the transmitters programmed failsafe will go into 50% throttle I even tried putting the switch into failsafe on my transmitter and turning it off and put in the bind plug in the receiver power up the mc pull the bind plug turn on the transmitter while holding the bind button down after it is complete it seems fine until I test the failsafe by turning of the transmitter and nothing happens its stuck in gps mode I have a dx6e and ar610 rec and naza lite what gives???
Tao Winterpaw
August 27, 2017 at 10:28 pmHey Rodney,
I also had a little weird time setting this up, I had to cause my remote to be calibrated to a off-set stick calibration and save that as a fail-save position so that the Naza also sees it as a fail-save.
Basically you have to cause a false stick position or calibration range on your remote and save that as “stick” position for fail-save (since if you take a look at the Naza assistant you can see that technically everything out of a certain move or stick range is already triggering a fail-save).
So you just have to cause you remote to produce a stick movement that exceeds the tolerance value of the stick.
Regards,
Tao Winterpaw
rodney
August 27, 2017 at 10:57 pmwell that didn’t work either still the same problem guess I wont have to worry about losing a transmitter signal or cutting it off I have been flying models for 30 years and never had a transmitter cut off on me but did loose signal many times but that was on the old 72mhz
rodney
August 27, 2017 at 11:05 pmyou would think with the technology we have the equipment would be more compatible wonder what transmitters dji is using to base their setups on it doesn’t seem to be very compatible with spectrum radios to me a lot of headaches I have been at this setup for a month and still have not flown it and I thought helis were a pain
Tao Winterpaw
August 28, 2017 at 12:35 amHaha I know that feeling,
over here Spectrum remotes are not really common, most people use Graupner ones.
Derek Jackson
August 30, 2017 at 9:15 amNice write-up. Been looking for some help regarding lights. I have two Phantom spotlights and two rows of LEDs wired to a Turnigy receiver controlled switch. Worked fine on my previous quad but since I moved it over to a Discovery with the Naza -m V2, the lights don’t turn on. Using the traditional wiring setup. I have no gimbal. If I may ask, which port do you have your light plugged into and is there something special I need to do to get them to work? BTW, my radio is a Taranis.
Tao Winterpaw
September 2, 2017 at 5:33 pmHello Derek,
I am using a Turnigy plane / helicopter light module which I can switch on and off with my remote (just with an on / off switch). I can’t tell you how other remotes behave, since I only use the Graupner ones.
Do you know how the switch acts normally? Is there maybe a way to calibrate your Turnigy switch?
Regards,
Tao Winterpaw
Derek Jackson
September 12, 2017 at 3:52 amHi Tao,
I previously had this hooked to a two-position switch when I was using a Pixhawk. Literally the only change here is that I now have it connected to a three-position switch (the two-position is now my RTH on the naza) on my Taranis. On the turnigy, you can have it either on, off or flashing, depending on how you short the pins. I think there must be something I can do to reprogram the switch on my Taranis to behave like a two-position switch.
rodney
September 4, 2017 at 2:45 amwell I did some more digging and found out you have to have a spektrum receiver with failsafe on all channels but not all of their receivers have it some only have it on the throttle which in my case the ar610 is on throttle only so far I have bought a spektrum dr6e transmitter an ar7700 receiver an ar610 receiver and still haven’t had it to work but since I am figuring out the spektrum ordeal and have sunk money into it and not getting it to work I will use that setup on my planes and I have purchased the frsky taranis qx7 transmitter and xr6 receiver I can turn off failsafe in this transmitter so the dji can recognize the fail safe command!!!haha one way to skin a cat!!!
PJ
April 27, 2018 at 2:03 pmHello,
I must say that this for sure is awesome guide for beginners, helps a lot I guess. Many thanks for it.
Recently I’ve bought an older DJI F550 build with NAZA M V2. I already own two racing quads which I can build and set up without any problems. Well, trying to get my current equipment working with the F550 got me into a dead end now. Could I ask for your help with it please? I’d be really grateful for that. Some basic information:
– hexacopter DJI F550 with Naza M V2 controller, PMU V2 power unit, GPS module, BTU unit and iOSD unit
– gimbal
– Tarot retractable landing gear
– FPV camera + 800 mW 5.8G transmitter
– Flysky FS-I6X 10-channel transmitter
– Flysky FS-X6B 6ch PWM / 8ch PPM / 16ch IBUS receiver
Now about the problem. I’m trying to get this working with my Flysky transmitter. Unfortunately Naza doesn’t support IBUS, so I have to use PPM to control it. So far I get sticks movement and switches working in the Naza Assistant.
The problem is that the retractable landing gear support only PWM input. As the only output from Naza controller is for gimbal, (which is there as well so I can’t use it for other purpose), the only way how to get everything working would be solving this on the receiver side (am I right?).
So the question probably is if it’s possible to use simultaneously the PWM and PPM output from Flysky receivers? I know this is not that much question about Naza, but hopefully someone will know this (Flysky doesn’t respond to my questions).
Another solution would be the Flysky IA10B receiver that provides 10 channels via PWM and now this is a question about Naza – so far what I’ve found out, Naza M V2 has only 6 channel PWM input, correct? Is it possible to connect at least 7 or better 8 channels via PPM to the Naza controller?
Thank you very much for answering.
Tao Winterpaw
April 27, 2018 at 3:19 pmHello PJ,
thank you for your comment.
To my knowledge, it is not possible to use different connection methods with only one receiver.
Also, the Naza V2 only supports as many channels, as it got features, so you would be losing the “additional” channels your receiver provides.
My best guess would be to just use traditional wiring for all channels, even though it could lead to a cable mess (if your landing gear supports regular connections).
Regards,
Tao Winterpaw
Blade
October 17, 2018 at 2:23 pmHello Tao
I am making a hexacopter as final project for school and I am gonna use a DJI Naza-M V2 Flight Controller + GPS, and want to add a follow me function to it. But the Naza-M V2 doesn’t have that and I don’t find anything about how to add this function could you pleas help me ?
Regards,
Blade
Tao Winterpaw
October 17, 2018 at 2:32 pmHello Blade,
thank you, for for your comment.
Unfortunately the NAZA V2 is unable to provide a “follow me” function, since it does not feature any tracking capabilities.
Regards,
Tao Winterpaw
Jeff
November 25, 2019 at 9:13 amI loved your article. Very informative.. It helped me a great deal get my F450 with Naza Lite MC wired up. I haves Tx and Rx communicating and visible on the Naza software, but I get an incessant red flashing LED, no motor power at all and a config error message, but I do not know what configuration is in error. Any ideas?
Tao Winterpaw
November 25, 2019 at 11:45 amHello Jeff,
thank you for your reply.
Could you tell me what exact config error message you are getting? There are several reasons why this could happen but I need at least the exact error message.
In the meantime, could you try to deactivate the voltage alarm of the Naza system? (I would recommend to get a Li-Po “beeper” alarm that you just plug into the balance jack of your battery which monitors each cell in flight and creates a really loud alarm tone when the battery reaches your pre-set limit, I found this to be more accurate than the Naza system, but you would lose the return home and land feature if you purchased the GPS module, since if you disable the voltage alarm he wouldn’t know when to turn home / land)
Regards
Tao Winterpaw
Matthew Mckamie
June 11, 2020 at 3:40 amOn the naza system, how would I wire in some led lights that I could turn on/off with a switch on my radio? Would I even use the naza outputs or just wire directly into the power of the aircraft?
Tao Winterpaw
June 11, 2020 at 10:41 amHello Metthew,
thank your for your comment.
Unfortunately I do not know a ready to run lighting system that would be able to be switched on or off via the remote. The ones I use are “always one” and are directly connected to my receiver and not the Naza controller.
To my knowledge DJI does not provide any LED sets for their flight systems.
I bought my LED kits from HobbyKing they provide lots of cool LED parts for multicopters.
There are some receiver LED on/off switches you can buy on Amazon, Aliexpress or Hobbyking which you would plug between your receiver and your LED’s to make them switchable though.
Regards,
Tao Winterpaw